
Welcome to the Midea MAP14AS1TWT-C installation manual! This guide provides step-by-step instructions for setting up your portable air conditioner safely and efficiently. Follow the detailed instructions to ensure proper installation and optimal performance. This manual covers everything from unpacking to maintenance, helping you get the most out of your unit. By adhering to the guidelines, you’ll ensure reliable operation and extend the lifespan of your air conditioner.
1.1 Overview of the Portable Air Conditioner
The Midea MAP14AS1TWT-C is a high-efficiency, portable air conditioner designed for cooling spaces up to 550 square feet. It features advanced inverter technology for ultra-quiet operation and energy savings. With a capacity of 14,000 BTU (12,000 BTU SACC), it offers both cooling and heating functions, making it versatile for year-round use. Weighing 73.85 lbs, it is compact and easy to move, while its smart features like Alexa and Google Home compatibility enhance convenience. This unit is ideal for homeowners seeking a powerful, yet portable cooling solution.
1.2 Importance of Proper Installation
Proper installation of the Midea MAP14AS1TWT-C is crucial for ensuring safe operation, optimal performance, and energy efficiency. Incorrect installation can lead to electrical hazards, reduced cooling capacity, or even unit damage. Following the manual’s guidelines ensures proper sealing, venting, and electrical connections, preventing potential issues. Additionally, correct installation maintains warranty validity and guarantees reliable long-term operation, making it essential to adhere to the provided instructions carefully.
Safety Precautions and Warnings
Always follow safety guidelines to avoid accidents and ensure proper operation. Adhere to electrical and installation instructions carefully to prevent hazards and maintain efficiency.
2.1 General Safety Guidelines
Read this manual carefully before installation to ensure safe and proper setup. Follow all safety guidelines to prevent electrical shock, fire hazards, and unit damage. Keep the installation area clear of obstructions and flammable materials. Only use approved accessories and follow manufacturer instructions for safe operation. Regular maintenance is crucial for optimal performance and safety. Save this manual for future reference and troubleshooting.
2.2 Electrical Safety Considerations
Electrical safety is critical when installing the Midea MAP14AS1TWT-C. Always use the correct power supply as specified in the manual. Avoid using extension cords to prevent voltage drops. Ensure the unit is properly grounded to avoid electrical shock. Keep the air conditioner away from water to prevent electrical hazards; Never overload circuits, and ensure all connections are secure. Follow these guidelines to ensure safe operation and prevent potential electrical hazards.
Unpacking and Preparation
Welcome to the unpacking and preparation section! Carefully unpack all components, ensuring no damage. Verify the contents match the manual. Prepare the installation area by clearing space and ensuring proper ventilation. Handle all parts with care to avoid damage. Follow these steps to ensure a smooth installation process.
3.1 Checking the Contents of the Box
Before starting the installation, carefully unpack and inspect all components. Ensure the box contains the air conditioner unit, window slider, bolts, exhaust hose, and user manual. Verify that all parts are in good condition and free from damage. Check for any missing items, as these are essential for proper installation. If any components are damaged or missing, contact customer support immediately. This step ensures a smooth installation process. Always refer to the manual for a detailed list of included items.
3.2 Preparing the Installation Location
Choose a flat, stable surface near a suitable window for your air conditioner. Ensure the area is clear of obstructions and flammable materials. The installation location must be well-ventilated to allow proper exhaust hose operation. Check that the window opening is compatible with the adjustable window slider. Secure the area to prevent accidents during installation. Proper preparation ensures safe and efficient operation of your Midea MAP14AS1TWT-C portable air conditioner. Always prioritize a stable and well-ventilated space for optimal performance.

Installation Steps
Follow the step-by-step guide to install your Midea MAP14AS1TWT-C portable air conditioner. Start by preparing the window slider, then install it securely. Next, assemble and connect the exhaust hose, ensuring proper venting. Finally, position the unit and ensure all components fit tightly for efficient operation. Refer to detailed instructions in the subsequent sections for each step.
4.1 Preparing the Window Slider and Bolts
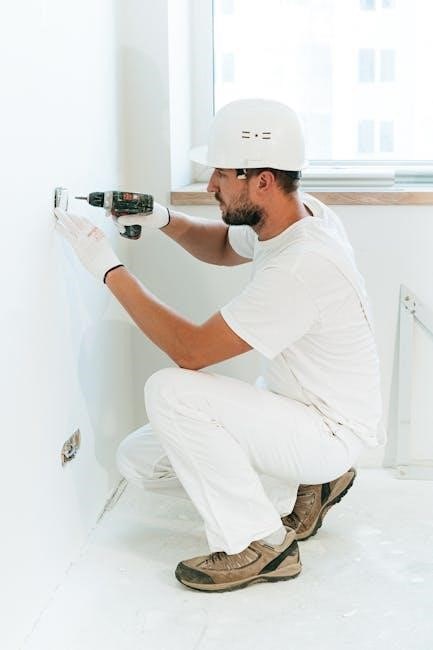
Start by unpacking the adjustable window slider and bolts from the box. Ensure all components are undamaged and compatible with your window type. Position the slider to fit your window width, securing it with the provided bolts. Tighten firmly to prevent movement. Level the slider to ensure proper alignment with the air conditioner. If unsure, consult a professional to avoid installation errors. Proper preparation ensures a secure and stable setup.
4.2 Installing the Adjustable Window Slider
Mount the adjustable window slider into the window opening, ensuring it fits snugly. Attach the slider brackets to the window frame using screws. Secure the slider to the air conditioner’s venting system. Tighten all connections firmly. Double-check the alignment and stability. Proper installation ensures effective cooling and prevents air leaks. Follow the manual’s guidelines for a secure and efficient setup. This step is crucial for optimal performance and safety.
4;3 Setting Up the Exhaust Hose Assembly
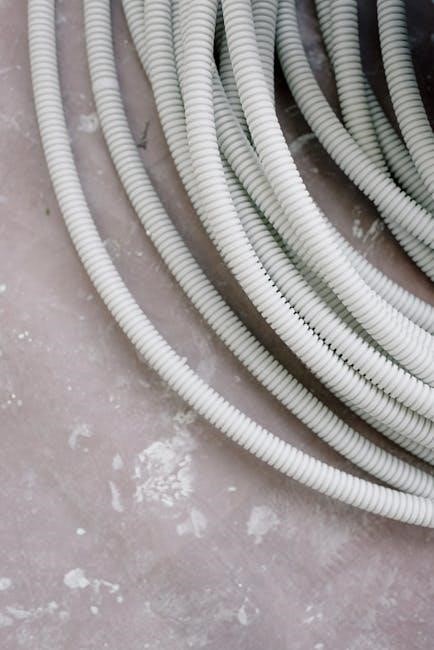
Attach the exhaust hose to the air conditioner’s outlet. Extend the hose to the desired length, ensuring it is securely connected. Use the provided hose rings to tighten the connections. Direct the hose to a suitable ventilation point, such as a window or sliding door. Avoid kinking or bending the hose excessively. Ensure the venting system is free from blockages for proper airflow. Regularly inspect the hose for leaks or damage. Follow the manual’s guidelines for optimal performance and safety.
Troubleshooting Common Issues
Identify common issues like leaks, insufficient cooling, or error codes. Check for proper installation, blocked filters, or kinked hoses. Refer to the manual for solutions. If problems persist, consult a professional for assistance. Regular checks can prevent major issues and ensure efficient operation. Troubleshooting helps maintain performance and extends the unit’s lifespan. Always follow safety guidelines when addressing malfunctions.
5.1 Identifying and Solving Installation Problems
Start by verifying all parts are included and undamaged. Ensure the window slider is securely fitted and the exhaust hose is properly connected. Check for any blockages or kinks in the hose, as these can restrict airflow. If the unit doesn’t power on, inspect the electrical connections and circuit. Consult the manual for troubleshooting specific error codes or unusual noises. Addressing installation issues promptly ensures smooth operation and prevents potential damage.
5.2 Common Errors and Solutions
Common installation errors include improper window slider alignment, loose electrical connections, and blocked exhaust hoses. If the unit doesn’t cool properly, ensure the window slider is securely fitted and the exhaust hose is unobstructed. For noise issues, check for loose parts or improper balancing. Reset the unit if it malfunctions, and consult the manual for specific error codes. Addressing these issues promptly ensures efficient operation and prevents damage to the air conditioner.

Maintenance and Cleaning
Regular maintenance and cleaning are essential for optimal performance. Clean the air filter monthly and drain condensate water as needed. Refer to specific sections for detailed guidance.
6;1 Cleaning the Air Filter
Cleaning the air filter is crucial for maintaining airflow and efficiency. Remove the filter monthly and gently vacuum or wash it with mild soap. Ensure it’s completely dry before reinstalling. A dirty filter can reduce cooling performance and increase energy consumption. Regular cleaning prevents dust buildup and ensures cleaner air circulation in your space. Always follow the manufacturer’s instructions for proper care and maintenance of the filter. This simple step enhances both performance and longevity of your air conditioner.
6.2 Draining Condensate Water
Regularly draining condensate water is essential to prevent accumulation and ensure efficient operation. Locate the drain pan or water outlet at the back of the unit. Use a compatible drain hose or pan to collect and dispose of the water properly. Check the drain pan frequently to avoid overflow. If using a hose, ensure it’s securely connected to prevent leaks. Proper drainage maintains airflow and prevents mold growth. Always refer to the manual for specific drainage recommendations.

Technical Specifications
The Midea MAP14AS1TWT-C features a cooling capacity of 14,000 BTU, weighing 73.85 lbs with dimensions suited for portable use. Its design ensures efficient performance and compact installation. This model is built to provide reliable cooling while maintaining energy efficiency, making it ideal for spaces up to 550 square feet. Refer to the manual for detailed technical data and specifications.
7.1 Capacity and Cooling Performance
The Midea MAP14AS1TWT-C offers a cooling capacity of 14,000 BTU, providing efficient cooling for spaces up to 550 square feet. With its high-efficiency inverter technology, it maintains consistent temperatures while minimizing energy consumption. This model ensures powerful cooling performance, making it suitable for various room sizes and climates. Proper installation and maintenance are crucial to optimize its cooling capabilities and extend its operational lifespan. Always refer to the manual for specific performance metrics and recommendations.
7.2 Weight and Dimensions
The Midea MAP14AS1TWT-C weighs approximately 73.85 pounds, making it a manageable yet sturdy unit for portable use. Its compact design ensures it fits seamlessly into various spaces, while its weight provides stability during operation. Always check the dimensions and weight specifications in the manual to ensure proper placement and installation in your desired location. These details are crucial for safe and efficient operation of the air conditioner.
Smart Features and Integration
The Midea MAP14AS1TWT-C offers smart features like Alexa and Google Home compatibility, enabling voice control for effortless operation. Use the remote control for convenient adjustments, ensuring seamless integration into your smart home system for enhanced comfort and efficiency.
8.1 Alexa and Google Home Compatibility
The Midea MAP14AS1TWT-C seamlessly integrates with Amazon Alexa and Google Home, allowing voice control for temperature, fan speed, and mode adjustments. Enable the Midea Smart AC skill in your smart home app to link your device. Once connected, you can effortlessly manage your air conditioner using simple voice commands, enhancing convenience and modernizing your cooling experience. This feature ensures smart home compatibility for optimal comfort.
8.2 Remote Control Operation
The Midea MAP14AS1TWT-C comes with a remote control for easy operation. Pair the remote with the unit by inserting batteries and ensuring proper signal reception. Use the remote to power on/off, adjust temperature, and switch modes. The remote also allows you to control fan speed and timer settings. Ensure the remote is within the unit’s line of sight for reliable operation. Refer to the remote’s button layout in the manual for detailed functionality guidance.
Window Slider Installation Tips
Ensure the window slider is aligned properly with the window frame for a secure fit. This prevents air leaks and maintains optimal cooling efficiency.
9.1 Securing the Window Slider
Ensure the window slider is securely attached to the window frame using the provided bolts; Tighten firmly to prevent movement, but avoid over-tightening, which could damage the slider. Proper alignment and stability are crucial for effective cooling and to prevent air leaks. Double-check that the slider is level and fits snugly within the window opening. This step is essential for maintaining the unit’s performance and energy efficiency.
9.2 Ensuring Proper Sealing
Proper sealing is crucial for optimal cooling performance and energy efficiency. Use the provided weatherstripping or foam tape to create an airtight seal around the window slider. Ensure the slider is aligned correctly with the window frame to avoid gaps. Inspect the seal for any leaks or openings and address them immediately. A secure seal prevents hot air from entering and cooled air from escaping, maximizing the unit’s effectiveness.
Exhaust Hose Setup and Venting
Proper exhaust hose setup is essential for efficient cooling. Secure all connections tightly and ensure the venting kit is correctly installed. Avoid leaks to maintain performance. This ensures optimal cooling and prevents issues.
10.1 Proper Venting Requirements
Ensure the exhaust hose is securely connected to both the unit and the window slider. Direct the vented air outside through a window or sliding door. Avoid bending the hose excessively, as this can restrict airflow. Proper venting ensures efficient cooling and prevents hot air from recirculating indoors. Always use the provided venting kit and follow the manufacturer’s guidelines for optimal performance and safety.
10.2 Avoiding Venting Mistakes
Avoid common venting mistakes to ensure efficient operation. Never route the exhaust hose indoors, as it can recirculate hot air. Do not use makeshift venting solutions; only the provided kit is safe. Ensure the window slider is sealed tightly to prevent air leaks. If the hose is kinked or bent, it can obstruct airflow. Always vent the exhaust outside to maintain cooling efficiency and prevent potential safety hazards.
Warranty Information
Your Midea MAP14AS1TWT-C is backed by a manufacturer warranty covering defects in materials and workmanship. Register your product and follow guidelines to ensure coverage. Contact the service center for details.
11.1 Manufacturer’s Warranty Details
Midea offers a comprehensive warranty for the MAP14AS1TWT-C, covering parts and labor for one year from purchase. The compressor is warranted for five years. Proper installation and maintenance are required to uphold warranty validity. For claims, contact Midea’s customer service with proof of purchase. Warranty terms may vary; refer to the manual or manufacturer’s website for specific details and regional variations.
11.2 Terms and Conditions
The warranty is void if the unit is improperly installed or tampered with. Damages due to misuse, neglect, or unauthorized modifications are not covered. The manufacturer reserves the right to amend terms without notice. For full details, refer to the manual or visit the official website. Proper installation and maintenance are essential to uphold warranty coverage. Terms are subject to change, so always verify the latest information.
Proper installation and regular maintenance ensure optimal performance and longevity. Follow guidelines carefully to enjoy efficient cooling and troubleshoot issues promptly for uninterrupted comfort. Ensure safety and efficiency always.
12.1 Final Checks Before Operation
Before turning on your Midea MAP14AS1TWT-C, ensure all components are securely installed. Verify the window slider is tightly sealed, the exhaust hose is properly vented, and electrical connections are secure. Check for any leaks or gaps that could affect performance. Confirm the air filter is clean and the remote control functions correctly. Finally, review the manual to ensure all safety guidelines are met for safe and efficient operation.
12.2 Long-Term Maintenance Tips
Regular maintenance ensures optimal performance and extends the lifespan of your Midea MAP14AS1TWT-C. Clean the air filter monthly to improve airflow and energy efficiency. Drain condensate water regularly to prevent leaks. Inspect the exhaust hose for damage or blockages and replace if necessary. Schedule professional servicing annually to check refrigerant levels and internal components. Proper care will keep your unit running smoothly and reliably for years.